Supabase RLS Auth 의 개념과 Next.js에서 적용하기
Supabase 프로젝트에서 RLS Auth 의 개념을 알아보고 Next.js 에 적용해보자
Intro,
Supabase 프로젝트를 진행하면서 로그인 과정을 구현하게 되었는데 role 값이 다양하다보니 헷갈리는 점이 있었고, 레퍼런스도 많지 않아서 Github 예제 코드를 모두 살펴 보면서 트러블슈팅하고 개선한 과정을 기록으로 남기려 한다.
🔒 Supabase Row-Level Security
Securing Your Tables
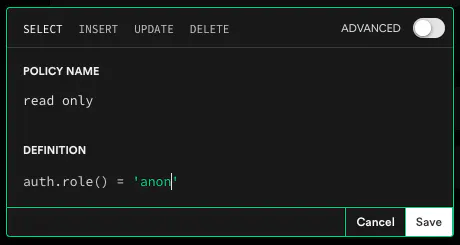
Supabase 에서는 Anon Key 를 통해 브라우저에 접근한 어떤 유저든 DB 의 데이터에 접근할 수 있도록 할 수 있다. ‘만약 anon key 를 이용한다면, 어떤 유저든 자바스크립트 코드를 읽고 키를 훔칠 수 있지 않을까? ’ 라는 의문이 생길 수 있는데, 이때 사용하는 것이 Postgres 의 RLS (Row-Level Security) 정책이다. 즉, anon key 로 접근이 가능한 데이터와 사용할 수 없게 접근을 제한해야하는 데이터를 ‘정책’을 만들어 설정할 수 있다. 예를 들어, anon key 는 누구나 Read 를 할 수는 있지만, Write / Update / Delete 를 할 수 없는 경우에 사용할 수 있다. Supabase 는 테이블마다 이런 정책으로 접근 권한을 다양하게 설정할 수 있다.
Roles
Supabase 는 postgres 에서 사전에 정의된 role 값과 Supabase 만의 프로젝트 시작 시 데이터베이스를 구성하는 role 값을 확장해서 사용한다. 그 예시는 다음과 같다. (출처: Postgres Roles | Supabase Docs)
postgres: Default Postgres 롤 값, 어드민 권한anon: PostgREST API 의 익명값 (유저가 로그인하지 않았을 때 사용)athenticator: special role for the API (PostgREST). It has very limited access, and is used to validate a JWT and then “change into” another role determined by the JWT verificationauthenticated: “authenticated access” 에 대한 롤, 유저가 로그인 했을 때 부여되는 권한service_role: For elevated access. This role is used by the API (PostgREST) to bypass Row Level Security.supabase_auth_admin: Used by the Auth middleware to connect to the database and run migration. Access is scoped to theauthschema.supabase_storage_admin: Used by the Auth middleware to connect to the database and run migration. Access is scoped to thestorageschema.dashboard_user: For running commands via the Supabase UI.supabase_admin: Supabase Administrative role for maintaining your database
API Key
Supabase 에서는 2가지 api key 가 존재한다. (출처: Understanding API Keys | Supabase Docs)
anon: RLS 를 설정해두었고 정책을 커스텀했다면 브라우저에서 안전하게 사용할 수 있는 키service_role: RLS 를 우회하여 사용할 수 있는 키로 Postgres 에서 사전에 정의된 권한이다. 서비스 관리자 권한에서 사용할 수 있는 권한이며 오직 private server 에서만 사용해야 한다. 예를 들어 백엔드에서 데이터 분석이 필요한 경우 사용할 수 있는 권한이다. 따라서 절대 service_role 키를 브라우저나 어디서든 노출되어서는 안 된다.
내가 헷갈렸던 지점이 이 부분이다. 단순히 anon 키는 로그인하지 않은 유저이고 service_role 키는 로그인한 유저에게 사용하는 키인줄 알았는데 잘못 생각했다. 공식 문서 꼼꼼하게 읽기…
🧑🚒 TroubleShooting
아무튼 내가 마주한 문제는 RLS 로 anon 을 허용하지 않는(특정 유저만 접근할 수 있는) 테이블에 대해서 API 를 요청해야 하는 일이 있었는데, 이를 Next.js 에서 전역으로 사용해주고 있는 supabaseClient 에 access token 을 어떻게 설정해주어야 하는지, api를 호출하는 유틸에서는 어떻게 사용해주어야 하는 문제였다.
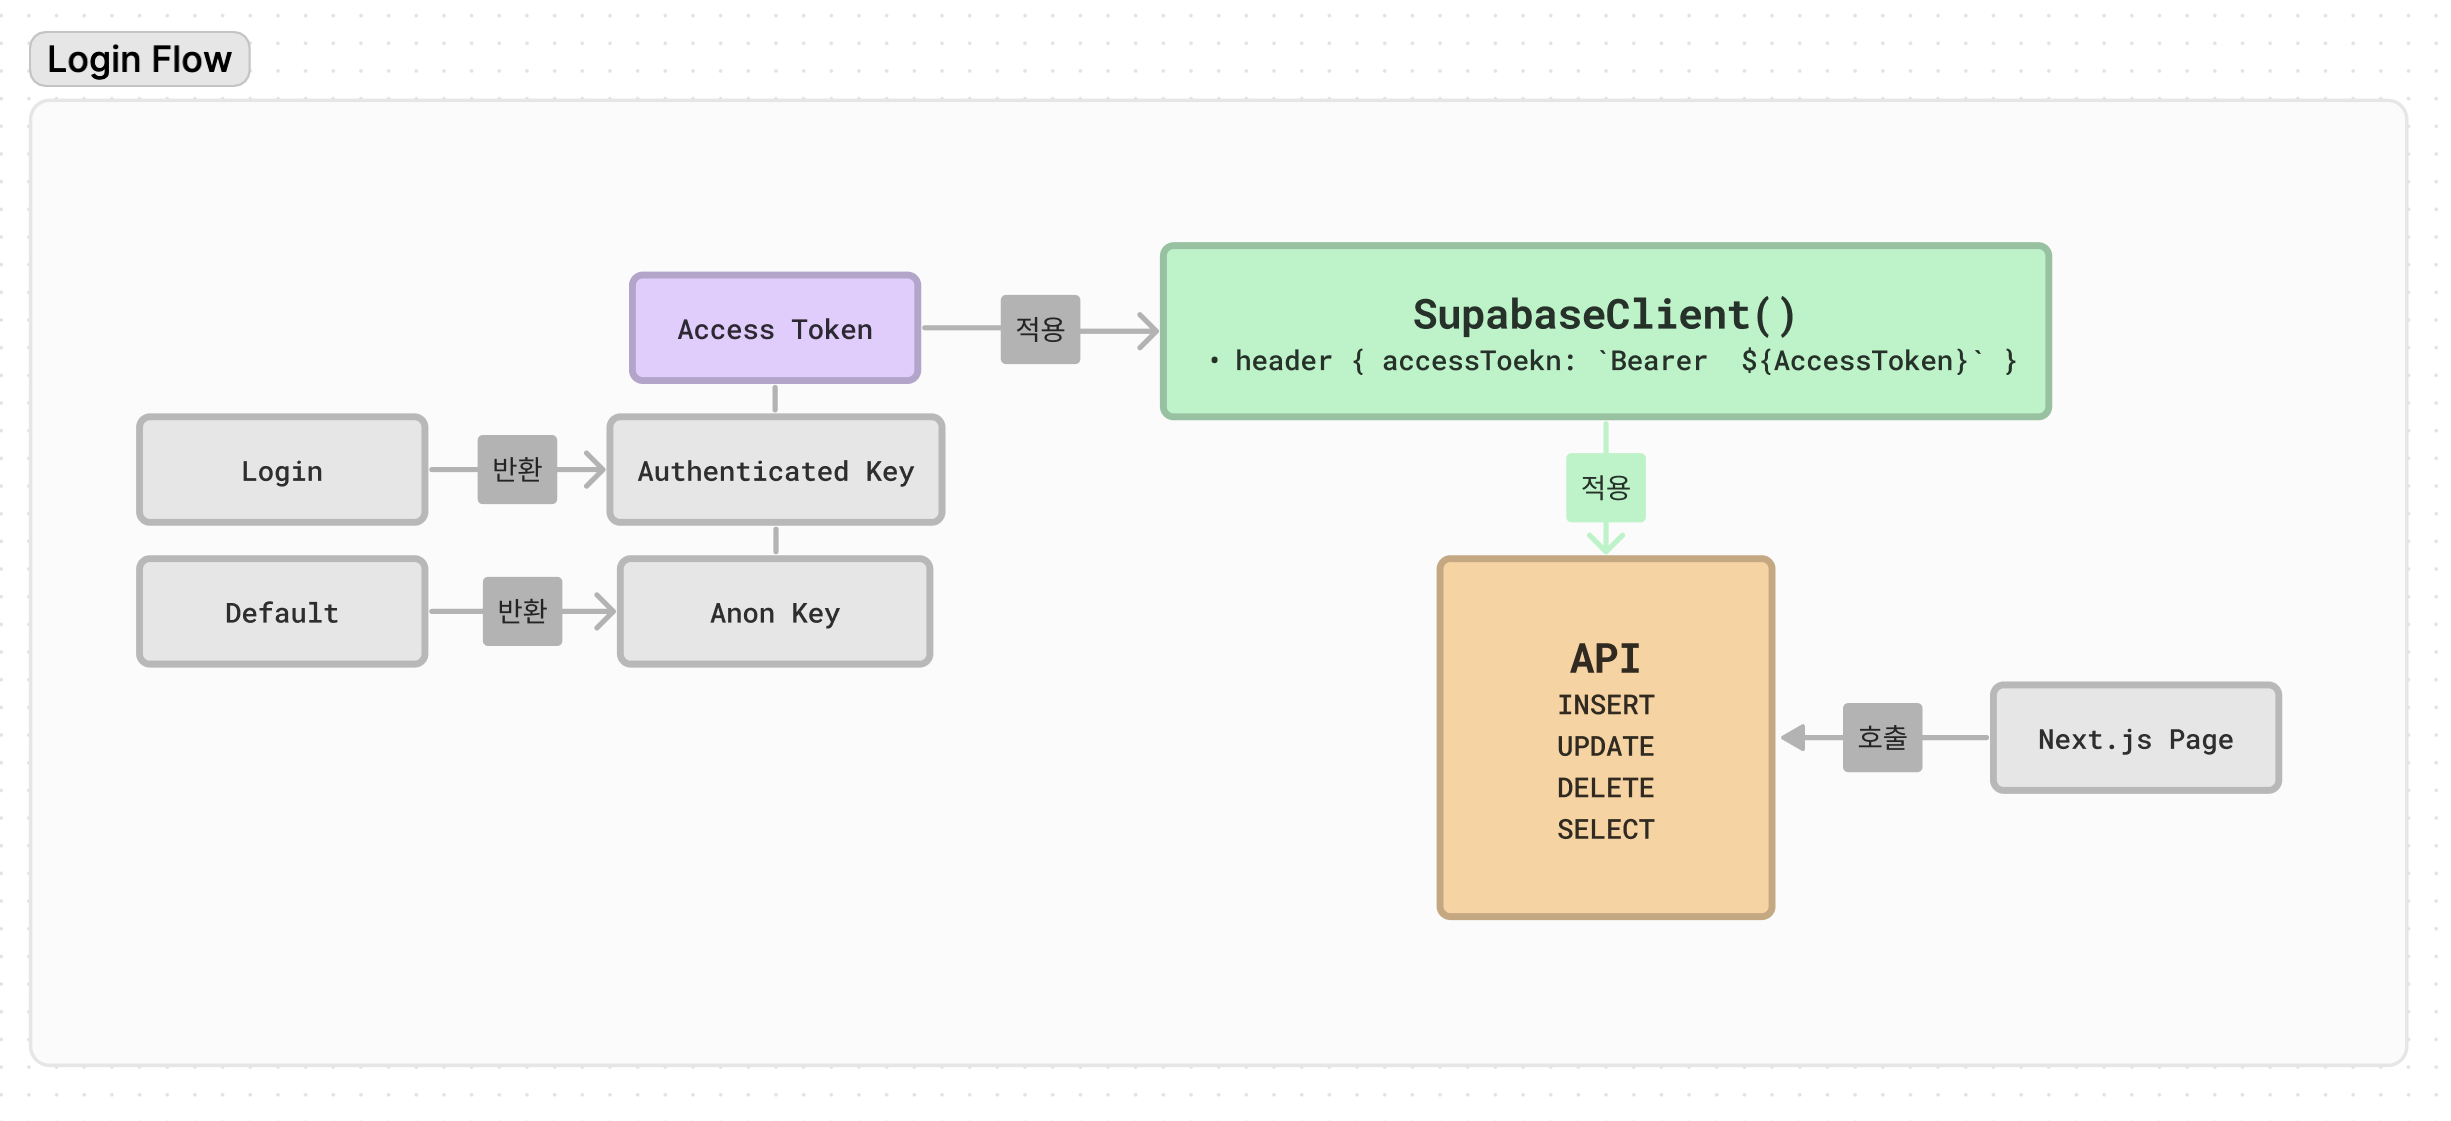
감이 잡히질 않아서, 아래의 Supabase 커뮤니티의 오픈소스 코드를 봤다. Graphql 을 사용한 예제라, 나처럼 supabase 유틸을 따로 사용한 경우는 아니지만, access token 을 어떤 식으로 세팅하면 좋을지 어느정도 참고를 해볼 수 있었다. (출처: supabase-graphql-example)
즉, 위 예제에 따르면 client 가 로그인이 되었다면 변경을 감지하여 accessToken 을 받아와 공통 헤더에 설정한 후 query api 를 호출할 수 있도록 설정해주고 있다.
1
2
3
4
5
6
7
8
9
10
11
12
13
14
15
16
17
18
19
20
21
22
23
24
25
26
27
28
29
30
31
32
import React from "react";
import { createClient, Provider } from "urql";
import { useSupabaseClient } from "./supabase";

export function UrqlProvider(props: { children: React.ReactNode }) {
  const supabaseClient = useSupabaseClient();

  function getHeaders(): Record<string, string> {
    const headers: Record<string, string> = {
      apikey: process.env.NEXT_PUBLIC_SUPABASE_ANON_KEY!,
    };
    const authorization = supabaseClient.auth.session()?.access_token;

    // access token 을 설정
    if (authorization) {
      headers["authorization"] = `Bearer ${authorization}`;
    }

    return headers;
  }

  // 변경된 헤더를 사용하여 fetch를 할 수 있도록 설정
  const [client] = React.useState(function createUrqlClient() {
    return createClient({
      url: `${process.env.NEXT_PUBLIC_SUPABASE_URL!}/graphql/v1`,
      fetchOptions: function createFetchOptions() {
        return { headers: getHeaders() };
      },
    });
  });
  return <Provider value={client}>{props.children}</Provider>;
}
생각해보니 지난 회사에서도 비슷한 방식이었던 것 같다. Auth 가 적용된 API 를 어떤식으로 호출해왔나 기억해보니, 1) API 용 Context Provider 가 존재하고 -> 2) 해당 Context 에 로그인된 유저의 accessToken 을 전달 -> 3) accessToken 을 헤더에 세팅 -> 4) 세팅된 헤더를 이용하여 API Fetch 하는 방식이었다. 정리하자면 로그인을 했을 경우 유저의 role 값 판단이 필요하니 accessToken 을 따로 헤더에 설정해주어야 한다.
나는 graphql 이 아닌, @supabase/auth-helpers 라이브러리를 사용할 것이기 때문에 1) supabase auth 유틸에서는 access token을 어떤 식으로 자동 세팅을 해주는 것이며, 2) 공통된 supabase 객체는 api 호출시 어떤식으로 불러서 사용해야 하냐를 먼저 파악해야 했다.
@supabase/auth-helpers 라이브러리에서는 로그인과 로그아웃 등 사용자의 auth 액션에 대해서 사용할 수 있는 유틸을 제공해주고 있다. 내가 위에서 가지고 있던 궁금증은 해당 라이브러리의 내부 코드를 분석해보면 알 수 있을 것 같았다. (출처: auth-helpers)
궁금한 점 1) Supabase Auth 유틸에서 Access Token 을 다루는 방법
@supbase/auth-helpers-nextjs 에서 제공해주고 있는 메소드를 알아보자.
createClient- createClient 메소드를 이용해서 Supabase 객체를 초기화해줄 수 있는 메소드
createClientComponentClient- useEffect 나 useState 같은 클라이언트 사이드 훅에서 허용 가능한 Client Component, 클라이언트 사이드에서 데이터를 가져온다.
createClientComponentClient는 싱글톤 패턴을 따른다. 즉, 모든 호출은 같은 슈퍼베이스 클라이언트 인스턴스를 반환한다는 것이다. 이 부분은 아래에서 차차 다뤄보려한다.
createServerComponentClient- Allow for asynchronous data to be fetched server-side.
createServerActionClient- Server Actions allow mutations to be performed server-side.
- Route Handlers —
createRouteHandlerClientin Route Handlers - Middleware —
createMiddlewareClientin Middleware
supabase/auth-helpers 에서 사용할 client 객체는 @supabase/supabase-js 에서 createClient 을 사용한다. createClient 의 내부 함수는 다음과 같다. 일부 생략하여 가져왔다.
1
2
3
4
5
6
7
8
9
10
11
12
13
14
15
16
17
18
19
20
21
22
23
24
25
26
27
28
29
30
31
32
33
34
35
36
37
38
39
40
41
42
43
44
45
46
47
48
49
50
51
52
53
54
55
56
57
58
59
60
61
62
63
64
65
66
67
68
69
70
71
72
73
74
75
76
77
78
79
80
81
82
83
84
85
86
87
88
89
90
91
92
93
94
95
96
97
98
99
100
101
102
103
104
105
106
107
108
109
110
111
112
113
114
115
116
117
118
119
120
121
122
123
124
125
126
127
128
129
130
131
132
133
134
135
136
/**
 * Supabase Client.
 *
 * An isomorphic Javascript client for interacting with Postgres.
 */
export default class SupabaseClient<
  Database = any,
  SchemaName extends string & keyof Database = 'public' extends keyof Database
    ? 'public'
    : string & keyof Database,
  Schema extends GenericSchema = Database[SchemaName] extends GenericSchema
    ? Database[SchemaName]
    : any
> {
  /**
   * Supabase Auth allows you to create and manage user sessions for access to data that is secured by access policies.
   */
  auth: SupabaseAuthClient
  realtime: RealtimeClient

  protected realtimeUrl: string
  protected authUrl: string
  protected storageUrl: string
  protected functionsUrl: string
  protected rest: PostgrestClient<Database, SchemaName>
  protected storageKey: string
  protected fetch?: Fetch
  protected changedAccessToken?: string

  protected headers: {
    [key: string]: string
  }

  constructor(
    protected supabaseUrl: string,
    protected supabaseKey: string,
    options?: SupabaseClientOptions<SchemaName>
  ) {
    if (!supabaseUrl) throw new Error('supabaseUrl is required.')
    if (!supabaseKey) throw new Error('supabaseKey is required.')

    const _supabaseUrl = stripTrailingSlash(supabaseUrl)

    this.realtimeUrl = `${_supabaseUrl}/realtime/v1`.replace(/^http/i, 'ws')
    this.authUrl = `${_supabaseUrl}/auth/v1`
    this.storageUrl = `${_supabaseUrl}/storage/v1`
    this.functionsUrl = `${_supabaseUrl}/functions/v1`

    // default storage key uses the supabase project ref as a namespace
    const defaultStorageKey = `sb-${new URL(this.authUrl).hostname.split('.')[0]}-auth-token`
    const DEFAULTS = {
      db: DEFAULT_DB_OPTIONS,
      realtime: DEFAULT_REALTIME_OPTIONS,
      auth: { ...DEFAULT_AUTH_OPTIONS, storageKey: defaultStorageKey },
      global: DEFAULT_GLOBAL_OPTIONS,
    }
    const settings = applySettingDefaults(options ?? {}, DEFAULTS)

    this.storageKey = settings.auth?.storageKey ?? ''
    this.headers = settings.global?.headers ?? {}


    this.auth = this._initSupabaseAuthClient(
      settings.auth ?? {},
      this.headers,
      settings.global?.fetch
    )

    this._listenForAuthEvents()
  }

  private async _getAccessToken() {
    const { data } = await this.auth.getSession()

    return data.session?.access_token ?? null
  }

  private _initSupabaseAuthClient(
    {
      autoRefreshToken,
      persistSession,
      detectSessionInUrl,
      storage,
      storageKey,
      flowType,
      debug,
    }: SupabaseAuthClientOptions,
    headers?: Record<string, string>,
    fetch?: Fetch
  ) {
    const authHeaders = {
      Authorization: `Bearer ${this.supabaseKey}`,
      apikey: `${this.supabaseKey}`,
    }
    return new SupabaseAuthClient({
      url: this.authUrl,
      headers: { ...authHeaders, ...headers },
      storageKey: storageKey,
      autoRefreshToken,
      persistSession,
      detectSessionInUrl,
      storage,
      flowType,
      debug,
      fetch,
    })
  }

  private _listenForAuthEvents() {
    let data = this.auth.onAuthStateChange((event, session) => {
      this._handleTokenChanged(event, 'CLIENT', session?.access_token)
    })
    return data
  }

  private _handleTokenChanged(
    event: AuthChangeEvent,
    source: 'CLIENT' | 'STORAGE',
    token?: string
  ) {
    if (
      (event === 'TOKEN_REFRESHED' || event === 'SIGNED_IN') &&
      this.changedAccessToken !== token
    ) {
      // Token has changed
      this.realtime.setAuth(token ?? null)

      this.changedAccessToken = token
    } else if (event === 'SIGNED_OUT') {
      // Token is removed
      this.realtime.setAuth(this.supabaseKey)
      if (source == 'STORAGE') this.auth.signOut()
      this.changedAccessToken = undefined
    }
  }
}
위 로직의 흐름은 다음과 같다.
[1] SupabaseClient 객체를 생성하며 supabaseUrl 과 supabaseKey 를 전달한다.
[2] 전달된 url 과 key 를 바탕으로 auth 등의 세팅값을 구성한다 ⇒ DEFAULTS
[3] 구성된 세팅값을 _initSupabaseAuthClient 에 전달하여 auth 를 구성한다.
- Supabase key 값을 이용하여 헤더의 Authorization 와 api key 값을 구성
- 이를 바탕으로 SupabaseAuthClient 를 생성
[4] _listenForAuthEvents 로 auth 의 변경을 감지하면 _handleTokenChanged 를 실행하여 변경 사항을 auth 설정에 반영
- events: AuthChangeEvent (Token Refreshed / Signed In / Signed Out )
- 예를 들어, Signed In 이벤트가 발생했다면 changedAccessToken 에 서버로부터 전달받은 access token 값을 저장하고 setAuth 를 실행함
Supabaea auth 유틸로 객체를 생성하면, 유저 로그인 시 자동으로 supabase client 를 업데이트하고 anon 의 롤이 authenticated 로 변경할 수 있다. 또 중요한 점은 싱글톤 패턴으로 이루어져 있기 때문에 createClienteComponentClient 메소드로 클라이언트 사이드에서 매번 Supabase 객체를 생성해도 이전의 값이 유지되어 생성이 된다는 점이다.
싱글톤 패턴은 객체의 인스턴스가 오직 1개만 생성되는 패턴이다. 최초 한 번의 new 연산자를 이용해서 고정된 메모리 영역을 이용하기 때문에 메모리 낭비를 막을 수 있고, 전역으로 사용되는 인스턴스이기 때문에 다른 클래스의 인스턴스들이 접근하여 사용할 수 있다. 하지만, 여러 클래스의 인스턴스에서 싱글톤 인스턴스의 데이터에 동시에 접근하게 되면 동시성 문제가 발생할 수 있다.
원래는 개발자가 provider-context 를 이용하여 세션 변경 등이 있을 때마다 Auth 객체의 정보를 유지해주어야 했지만, 싱글톤 패턴 덕분에 이런 과정 없이 바로 사용부에서 객체 생성을 바로 해주어도 정보가 유지가 된다.
The
createClientComponentClientfunction implements a Singleton pattern by default, meaning that all invocations will return the same Supabase client instance. If you need multiple Supabase instances across Client Components, you can pass an additional configuration option{ isSingleton: false }to get a new client every time this function is called.One of the big changes is that Client Component Supabase clients are now singleton instances, which was not the case before. Previously, we had to ensure that a single instance of Supabase was shared across Client Components. We did that using React Context and the
AuthProvidercomponent. Now, thanks to the clients being singletons, we can simply importcreateClientSupabaseClientand call it wherever we need a Supabase instance (in a Client Component)출처: https://www.misha.wtf/blog/supabase-auth-next-13-pkce
싱글톤 패턴이 구현되어 있는 createClientComponentClient 코드를 보자.
1
2
3
4
5
6
7
8
9
10
11
12
13
14
15
16
17
18
19
20
21
22
23
24
25
26
27
28
29
30
31
32
33
34
35
36
37
38
39
40
41
42
43
44
45
46
47
48
49
50
51
52
53
54
55
56
57
58
59
60
61
62
63
64
65
66
67
68
69
70
71
import {
	BrowserCookieAuthStorageAdapter,
	CookieOptionsWithName,
	SupabaseClientOptionsWithoutAuth,
	createSupabaseClient
} from '@supabase/auth-helpers-shared';

import type { SupabaseClient } from '@supabase/supabase-js';
import type { GenericSchema } from '@supabase/supabase-js/dist/module/lib/types';

// can't type this properly as `Database`, `SchemaName` and `Schema` are only available within `createClientComponentClient` function
let supabase: any;

export function createClientComponentClient<
	Database = any,
	SchemaName extends string & keyof Database = 'public' extends keyof Database
		? 'public'
		: string & keyof Database,
	Schema extends GenericSchema = Database[SchemaName] extends GenericSchema
		? Database[SchemaName]
		: any
>({
	supabaseUrl = process.env.NEXT_PUBLIC_SUPABASE_URL,
	supabaseKey = process.env.NEXT_PUBLIC_SUPABASE_ANON_KEY,
	options,
	cookieOptions,
	isSingleton = true
}: {
	supabaseUrl?: string;
	supabaseKey?: string;
	options?: SupabaseClientOptionsWithoutAuth<SchemaName>;
	cookieOptions?: CookieOptionsWithName;
	isSingleton?: boolean;
} = {}): SupabaseClient<Database, SchemaName, Schema> {
	if (!supabaseUrl || !supabaseKey) {
		throw new Error(
			'either NEXT_PUBLIC_SUPABASE_URL and NEXT_PUBLIC_SUPABASE_ANON_KEY env variables or supabaseUrl and supabaseKey are required!'
		);
	}

	const createNewClient = () =>
		createSupabaseClient<Database, SchemaName, Schema>(supabaseUrl, supabaseKey, {
			...options,
			global: {
				...options?.global,
				headers: {
					...options?.global?.headers,
					'X-Client-Info': `${PACKAGE_NAME}@${PACKAGE_VERSION}`
				}
			},
			auth: {
				storage: new BrowserCookieAuthStorageAdapter(cookieOptions)
			}
		});

	if (isSingleton) {
		// The `Singleton` pattern is the default to simplify the instantiation
		// of a Supabase client across Client Components.
		const _supabase = supabase ?? createNewClient();
		// For SSG and SSR always create a new Supabase client
		if (typeof window === 'undefined') return _supabase;
		// Create the Supabase client once in the client
		if (!supabase) supabase = _supabase;
		return supabase;
	}

	// This allows for multiple Supabase clients, which may be required when using
	// multiple schemas. The user will be responsible for ensuring a single
	// instance of Supabase is used across Client Components, for each schema.
	return createNewClient();
}
우선 맨 상단에 let 으로 정의된 supabase 변수를 정의했다. 이 변수는 첫 호출에서 createNewClient 를 통해 초기화가 가능하지만, 만약 isSingleton 이 true 인 경우에는 추후 createClientComponentClient 가 호출이 되더라도 새롭게 생성하는 것이 아니라 이전에 저장된 값을 반환하게 되는 구조이다. 만약 isSigleton 이 false 라면 새롭게 계속 객체를 생성할 것이다.
궁금증 2) Supabase Client 객체를 API 호출 시 어떤 식으로 불러서 사용해야 하나
Supabase 는 클라이언트 사이드에서 createClient 를 통해 auth 를 관리하는 객체를 생성할 수 있고, 유저가 로그인을 하는 등의 액션을 감지하여 accessToken 과 role 을 설정한다. 그리고 싱글톤 패턴을 따르기 때문에 createClientComponentClient 같은 메소드를 여러곳에서 사용하더라도 새롭게 객체를 생성하는 방식이 아니라, 기존에 생성했던 객체를 반환한다.
따라서, API 호출 로직에서 createClientComponentClient 를 사용하더라도 로그인 시 auth 권한은 자동으로 설정되기 때문에 accessToken 을 매번 수동으로 설정해야 하는 문제는 없을 것이다. 하지만 같은 API 호출을 여러 다른 컴포넌트에서 사용해야하는 상황, 즉 서버사이드이냐 클라이언트 사이드냐에 따라 선언하는 supabase 객체가 다르다면 어떻게 해야 할까?
[1] 같은 API 호출 로직을 여러 컴포넌트에서 사용한다면? ⇒ 호출 로직 자체는 공통 유틸로 분리히여 하나로 뭉친다.
[2] 서버사이드이냐 클라이언트 사이드냐에 따라 선언하는 supabase 객체를 다르게 적용해주어야 한다면? ⇒ supabase 객체를 API 호출에 사용할 수 있도록 props 로 넘긴다. 즉, 클라이언트나 서버사이드에서 Supabase 객체를 생성하면, 이를 API 로직에 매개변수로 넘겨주고 고차 함수를 이용해서 해결해보려 했다. 즉, 고차함수를 이용하여 API 메소드를 정의하면 외부에서 해당 메소드에 필요한 의존성(supabase 객체)을 주입할 수 있고 실제 필요한 매개변수와 섞여서 사용할 일이 없기 때문에 가독성을 조금 더 높여볼 수 있을 것이라 생각했다.
1
2
3
4
5
6
7
8
9
// API 스펙 (fetchApi.ts)
const fetchApi = supabase = async(props) => { supabase.from(...) }

// 사용부 (Component.tsx)
const supabaseClient = createClientComponentClient(); // 클라이언트 사이드
const supabaseServerClient = createServerComponentClient(); // 서버 사이드

const result1 = fetchApi(supabseClient)(a, b);
const result2 = fetchApi(supabaseServerClient)(a, b);
위와 같이 정의를 해주면 API 스펙은 공통 유틸로 따로 빼서 관리가 가능하고 서버사이드/클라이언트 사이드에서 정의한 객체를 주입해서 다양한 상황에서 대응이 가능할 것이라 생각했다. 이제 실제로 해당 코드가 잘 동작하는지 테스트해보자.
[1] 테이블의 권한 설정
- 로그인한 유저만 데이터에 접근할 수 있는 경우 -> role 을 authenticated 로 설정
- 익명 유저가 데이터에 접근할 수 있는 경우 -> role 을 anon 으로 설정
[2] API 스펙을 정의한 공통 유틸 함수를 작성
- supabase 객체와 매게변수를 받는 고차 함수를 작성
1
2
3
4
5
6
7
8
9
10
11
12
13
14
15
16
17
18
19
20
21
22
23
24
25
26
27
28
export const fetchAllData =(supabase: SupabaseClientType) => async ({
  keyword,
  category,
  ascending,
  offset,
  pageCount,
}: {
  keyword: string;
  category: string;
  ascending: boolean;
  offset: number;
  pageCount: number;
}) => {
  const { data, error } = await supabase
    .from("Data") // 예시
    .select("*")
    // Filters
    .like("area", `%${keyword}%`)
    .like("category", `%${category}%`)
    .order("created_at", { ascending: ascending })
    .range(offset, offset + pageCount - 1);

  if (error) {
    throw new Error("fail to fetch all data");
  }

  return { data: camelizeKeys(data) as DataType[]};
};
[3] Fetch 유틸 함수 전체를 관리하는 래핑 함수를 생성
1
2
3
4
5
export const companyAPI = ({
  companyApiFetchAllData: (supabase: SupabaseClientType) => fetchAllData(supabase),
  companyApiFetchDataById: (supabase: SupabaseClientType) => fetchDataById(supabase),
	// 등등
})
[4] 컴포넌트 단에서 API 호출
1
2
3
4
5
const supabaseClient = createClientComponentClient(); // 만약 서버사이드라면 createServerComponentClient 를 사용하면 될 것이다.
const { data, isFetching } = useQuery(["review", uuid], async () => {
	if (uuid) return await companyAPI.companyApiFetchAllData(supabaseClient)({ uuid });
    return null;
});
후기 (업보 청산)
사실 옛날에 header에 access token 을 달리하여 API 를 호출해야 하는 이슈를 만난 적이 있다. 그때는 워낙 바빴고 Next.js 의 서버사이드의 개념도 너무 어려웠기 때문에 임시로 처리를 했었다. 그리고 그 프로젝트는 안타깝게도 역사 속으로 사라지고 말았다. 자책을 많이 했었던 프로젝트라 마음이 아픈데, 개발을 게속 하다보니 당시 땜빵으로 처리했던게 업보로 돌아오는 것이다. 기술도 기술인데, 업무 중에 놓쳐버린 개념과 실수들을 복기하지 않으면 다시 마주하게 되고 또 같은 실수를 저지르고 말 것이다. 그러니, 복기해서 다음에 같은 업무를 마주해도 유연하게 해결해볼 수 있도록 노력하자.